SQL Server: Locking Parent Tables 14 August, 2016
A while back I came across a problem a concurrency issue at work that took several iterations to determine an appropriate fix for. The basic problem was that we had a table representing a parent entity and a dependent child entity. The child entity had an integer column to specify the sort ordering of the children within the parent. For a more concrete example imagine a photo management application. You may have a gallery entity (the parent) which contains a list of photos (the child entity) which can be re-arranged by the user.
For the sake of simplicity we'll strip down a lot of the properties on these entities to the bare essentials required for our example.
CREATE TABLE Gallery (
    Id INTEGER IDENTITY(1,1) PRIMARY KEY,
    Name VARCHAR(50) NOT NULL
)

CREATE TABLE Photo (
    Id INTEGER IDENTITY(1, 1) PRIMARY KEY,
    Name VARCHAR(50) NOT NULL,
    GalleryId INT NOT NULL,
    SortOrder INT NOT NULL,
    CONSTRAINT FK_Photo_GalleryId_Gallery_Id FOREIGN KEY (GalleryId) REFERENCES Gallery (Id)
)
Let's populate the tables with some sample data;
SET IDENTITY_INSERT Gallery ON
INSERT INTO Gallery (Id, Name) VALUES (1, 'Ski trip')
SET IDENTITY_INSERT Gallery OFF

SET IDENTITY_INSERT Photo ON
INSERT INTO Photo (Id, Name, GalleryId, SortOrder) VALUES (1, 'Me falling over', 1, 0)
INSERT INTO Photo (Id, Name, GalleryId, SortOrder) VALUES (2, 'Me falling over... again', 1, 1)
INSERT INTO Photo (Id, Name, GalleryId, SortOrder) VALUES (3, 'Still falling over...', 1, 2)
SET IDENTITY_INSERT Photo OFF
You can imagine a simple query to retrieve the Photos in a Gallery as being something like;
DECLARE @GalleryId INT = 1

SELECT  P.*
FROM    Photo P
WHERE   P.GalleryId = @GalleryId
ORDER
BY      P.SortOrder
Pretty simple stuff. To be honest we don't really care if the first Photo in a gallery has a SortOrder of 0 or 10 or -20. As long as its value is less than the second Photo's SortOrder every thing is fine. So all we need to do is when we insert a new Photo we insert it with a value greater than any other Photo. Great! Let's have a crack at writing an INSERT for this scenario;
BEGIN TRAN

DECLARE @Name VARCHAR(50) = 'A new photo of me falling over',
        @GalleryId INT = 1,
        @SortOrder INT = NULL

SELECT  @SortOrder = MAX(P.SortOrder) + 1
FROM    Photo P
WHERE   P.GalleryId = @GalleryId

SELECT  @SortOrder = ISNULL(@SortOrder, 0)

INSERT INTO Photo (
        Name,
        GalleryId,
        SortOrder
)
SELECT  @Name,
        @GalleryId,
        @SortOrder

COMMIT TRAN
The determination of @SortOrder here is a little contrived. In an actual solution you could move the standalone SELECT into a sub-SELECT on the INSERT statement but let's just imagine that there's a constraint that requires this explicit separation. You launch the feature and after a few weeks you review the data and you notice a puzzling thing you're seeing instances where for a given Photo.GalleryId there's multiple items where Photo.SortOrder is duplicated. After some analysis it should be obvious what's happening; one Photo is attempting to get inserted and before it can complete a second Photo insertion attempt happens and evaluates @SortOrder to be the same as the first.
I've written previously about WAITFOR and how useful it is for debugging concurrency issues. So we'll use it again here. We can chuck a WAITFOR DELAY 00:00:05 before our INSERT statement and execute the statement multiple times to simulate this concurrency in human-doable-times. As below...
BEGIN TRAN

DECLARE @Name VARCHAR(50) = 'A second new photo of me falling over',
        @GalleryId INT = 1,
        @SortOrder INT = NULL

SELECT  @SortOrder = MAX(P.SortOrder) + 1
FROM    Photo P
WHERE   P.GalleryId = @GalleryId

SELECT  @SortOrder = ISNULL(@SortOrder, 0)

WAITFOR DELAY '00:00:05'

INSERT INTO Photo (
        Name,
        GalleryId,
        SortOrder
)
SELECT  @Name,
        @GalleryId,
        @SortOrder

COMMIT TRAN

SELECT  *
FROM    Photo
WHERE   GalleryId = @GalleryId
What we're going to do is run this statement twice. Once with the WAITFOR and once without. You want to run the statement with the WAITFOR and then wait a second or two before running the version without the WAITFOR.
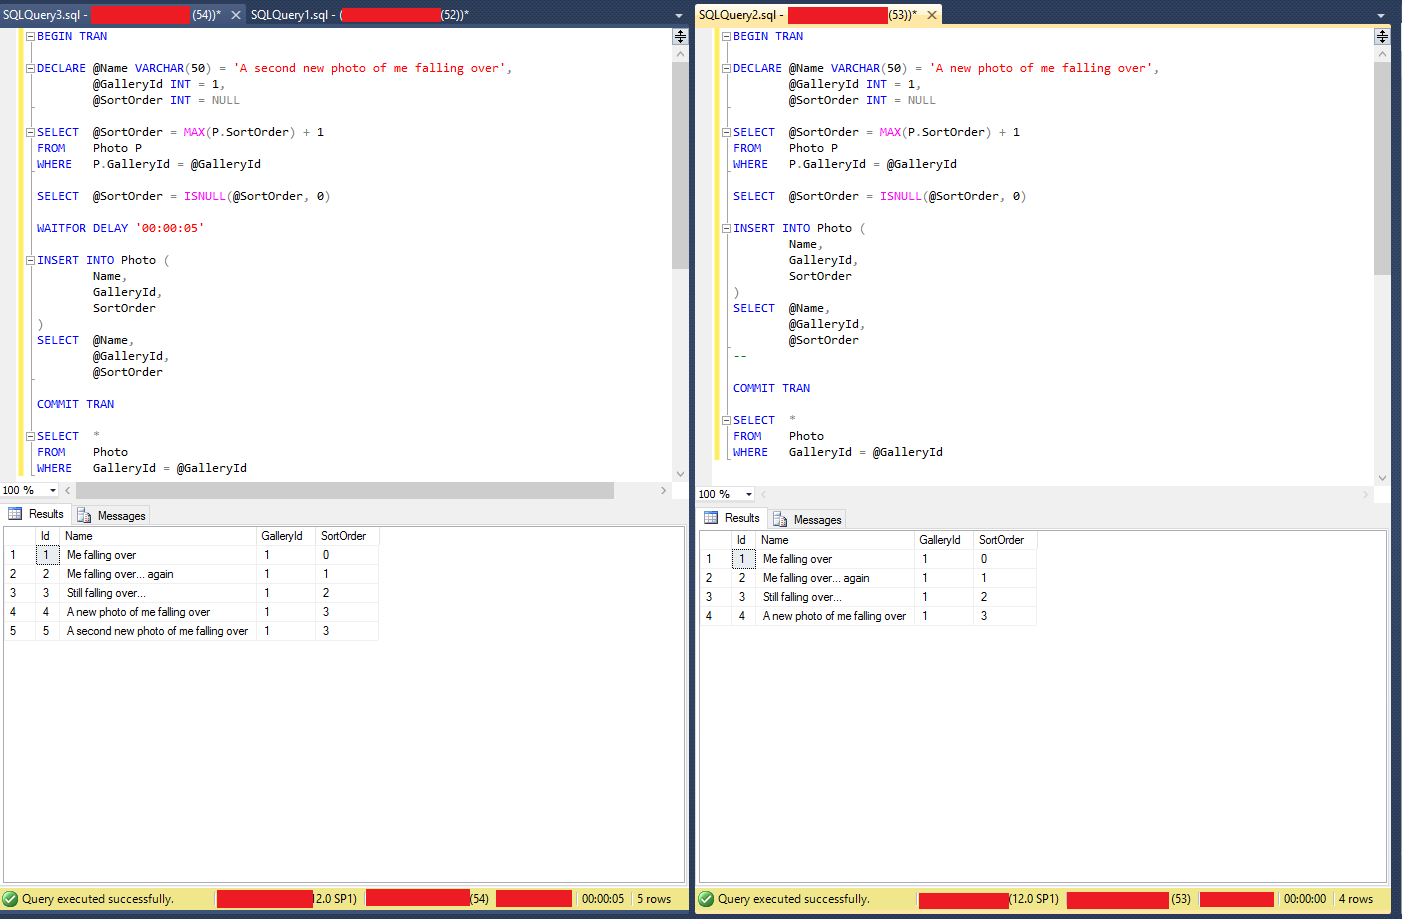
In this example I've ran the statement on the left handside, waited a second or two, and then ran the statement on the right hand side. You can see the left hand side results shows the two Photo entities with a SortOrder of 3. Not what we want. What we need to do is take a lock on Photo of some kind so that concurrent statements are blocked until this statement returns. We don't want a TABLOCK or TABLOCKX as those are too coarse grained. We can instead try an UPDLOCK which takes a lock until the entire transaction competes (not just the statement). Let's update our insertion statement appropriately...
BEGIN TRAN

DECLARE @Name VARCHAR(50) = 'A second new photo of me falling over',
        @GalleryId INT = 1,
        @SortOrder INT = NULL

SELECT  @SortOrder = MAX(P.SortOrder) + 1
FROM    Photo P (UPDLOCK)
WHERE   P.GalleryId = @GalleryId

SELECT  @SortOrder = ISNULL(@SortOrder, 0)

WAITFOR DELAY '00:00:05'

INSERT INTO Photo (
        Name,
        GalleryId,
        SortOrder
)
SELECT  @Name,
        @GalleryId,
        @SortOrder

COMMIT TRAN

SELECT  *
FROM    Photo
WHERE   GalleryId = @GalleryId
Now we'll re-run our two statements side by side again (I've truncated the Photo table and re-inserted the initial data)
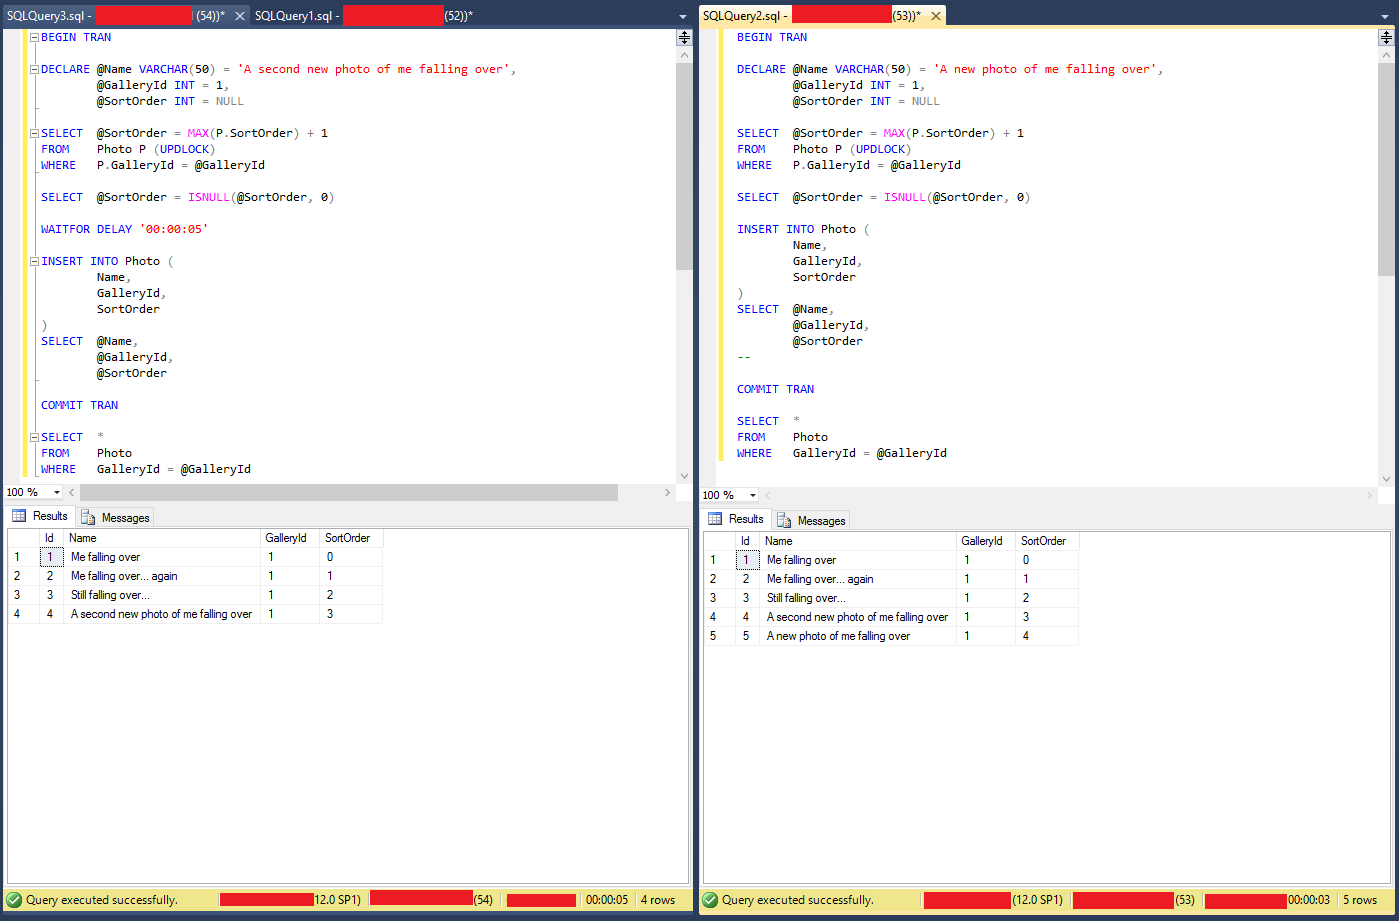
Hooray! We now get the correct results; all items have unique Photo.SortOrder values. As per before the left hand side query was executed and then, a few seconds later, I executed the right hand side. One thing to note here is that, as I mentioned, the UPDLOCK takes the lock until the transaction completes. As such the right hand side now takes 3 seconds to complete (as it has to wait for the left hand side's WAITFOR). At this stage you're probably pretty pleased with yourself. So you quickly patch the feature, roll it to production, and pat yourself on the back.
A few weeks pass someone notices that, again, there's duplicate Photo.SortOrder values for a given Photo.GalleryId. But we just fixed this! Upon further investigation you notice that the duplicate values are always zero. That's... interesting you think. Why would that be the case? They duplicate values are always zero so it's probably something to do with a new Gallery. Let's create a new Gallery;
INSERT INTO Gallery (Name) VALUES ('Kittens')
Now we'll re-run our INSERT statements, with the UPDLOCK, from earlier. Only now for @GalleryId = 2.
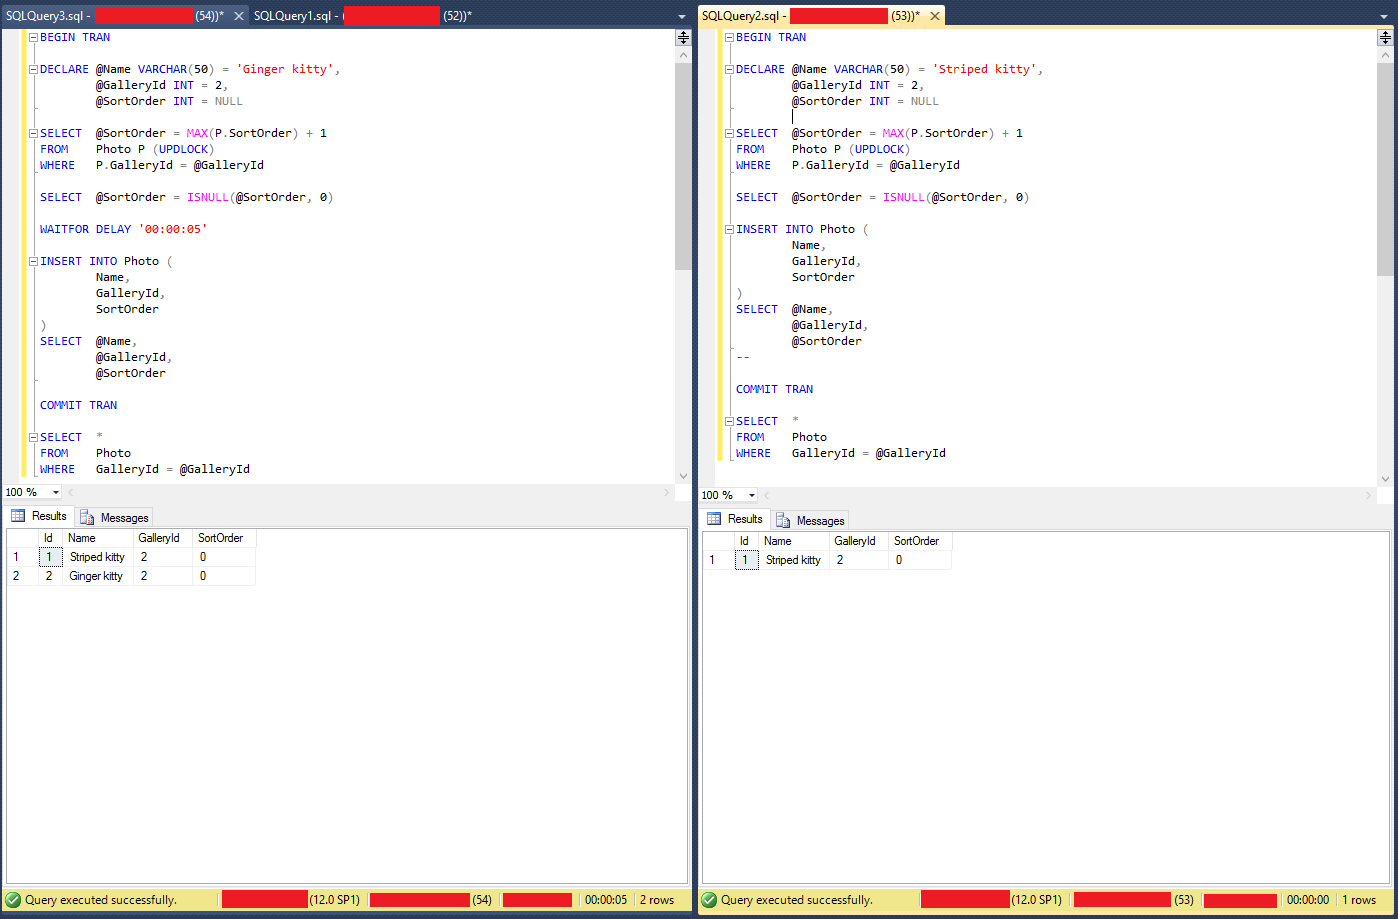
Ahar! We reproduced the issue. We've ended up with two Image.SortOrder values of 0. Looking at this a bit closer you'll also notice that, like our initial INSERT, the right hand side in this query has returned immediately. It no longer waits for the left hand side to execute. But there's an UPDLOCK! Shouldn't it be blocking the right hand side query? Well, unfortunately, because there's no items SQL Server has nothing to actually lock until the transaction completes. This allows the right hand side to execute before the left hand side has inserted the record. We could modify the UPDLOCK to be a TABLOCK or TABLOCKX but then if I'm inserting into Gallery A I'm blocked by someone else inserting into Gallery B which is less than ideal. Unfortunate because this UPDLOCK version is nice and granular... but it's no use to us if we have nothing to lock on. Unless... the Photo always belongs to a Gallery, right? And it has a foreign key to Gallery ensuring this is true. Instead of locking the Photo can we lock the Gallery? Let's try...
First we'll create a new Gallery
INSERT INTO Gallery (Name) VALUES ('Puppies')
Now we'll re-work our INSERT statement to lock the Gallery;
BEGIN TRAN

DECLARE @Name VARCHAR(50) = 'A small puppy',
        @GalleryId INT = 3,
        @SortOrder INT = NULL,
        @Locked BIT = 0

SELECT  @Locked = 1
FROM    Gallery G WITH (UPDLOCK, ROWLOCK)
WHERE   G.Id = @GalleryId

SELECT  @SortOrder = MAX(P.SortOrder) + 1
FROM    Photo P
WHERE   P.GalleryId = @GalleryId

SELECT  @SortOrder = ISNULL(@SortOrder, 0)

WAITFOR DELAY '00:00:05'

INSERT INTO Photo (
        Name,
        GalleryId,
        SortOrder
)
SELECT  @Name,
        @GalleryId,
        @SortOrder

COMMIT TRAN

SELECT  *
FROM    Photo
WHERE   GalleryId = @GalleryId
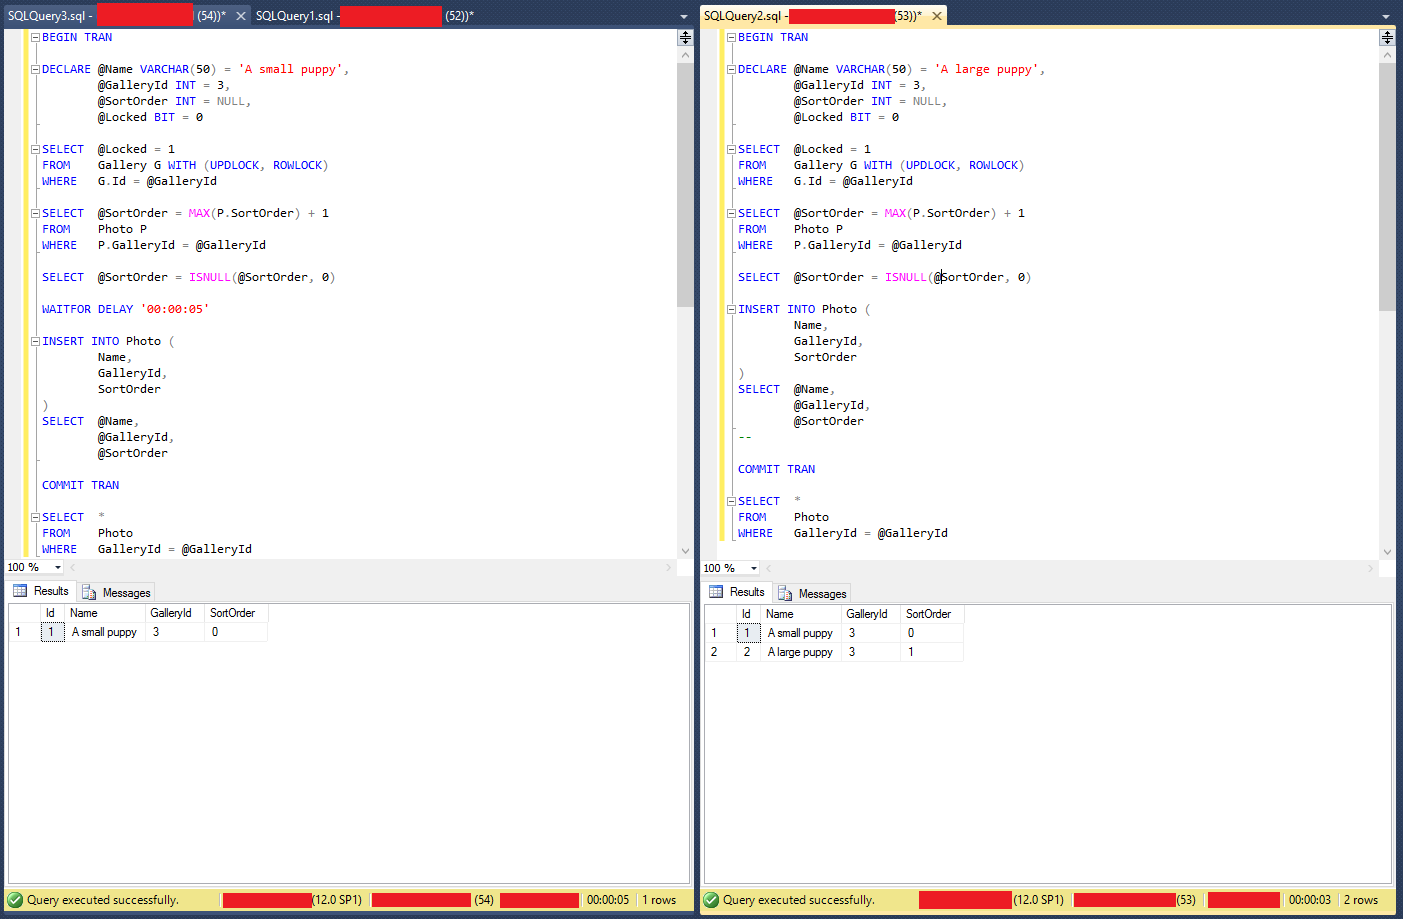
And... success! Once again the right hand side has taken a few seconds to execute as it waits for the left hand side to complete before it can acquire the UPDLOCK on Gallery. And once again we have unique values of Photo.SortOrder as we required. We've also introduced the ROWLOCK hint to indicate we only want to lock the rows returned by the SELECT on Gallery. Depending on your index applied this shouldn't be necessary but I've not encountered any issues hinting you only want to lock the row. Between these two hints this ensures that whilst the right hand side took several seconds to complete it is only because it was inserting into the same Gallery as the left hand side. If you were to insert into a different gallery it'd return instantly.
I've been running this style of locking model for several months in a production environment and it has completely removed the data duplication we were experiencing. Whilst there's other methods you could use to eliminate the source of error this one ended up working for me and is also easy to verify the behaviour.
Finding Dominant Colours in Images 6 October, 2015
A colleague recently shared a link to Charles Leifer's blog post on finding dominant colours in images and mentioned it was something he'd like to eventually integrate into our own product at some time. K-Means clustering is something I have a vague familiarity with but isn't something I've personally implemented before so with a spare day over the weekend I figured I'd give it a shot.
If you don't have an background in algorithms reading about K-Means clustering will lead you to all sorts of Greek letters and mathematical symbols which may be a little confusing but the actual algorithm is surprisingly straight forward. If you just want to dive straight into the code have a look at my code samples repository which has a simple implementation. Otherwise, stick with me.
If you're not familiar with this idea it might help to start with a few examples. Below are three examples produced via the code linked above. In each of them the bottom of the image has three colour swatches which are the k means clusters (in this example, k is 3).
Examples


I think looking at these three sample images (all from the Morgue File Project and free for use) highlights some interesting aspects of the algorithm. The coffee and rose images swatches both look like what your, or at least, my expectation of the dominant colours are in these images. The plastic figurine image isn't what I initially expected and this gets into the difference between perceived dominance and statistical colour dominance. Looking at this image the light and dark grey and the black are indeed the most common colours in the image but they're not the one your eyes are drawn to. You immediately notice the blue of the figures shoes and shirt, yellow pants and ginger hair. However the statistical commonality of these colours is rather low (and their variance from each other would mute their affect on the algorithm). If you are looking for something to get this highlight colour out there's a few things you could do which I'll discuss later.
Algorithm
Now the actual algorithm;
- Collect your data. Here I'm using .Net's
Imageclass to load the pixel data - Determine a set of
kinitial clusters for your data - For each pixel in your image determine the colour's Euclidean distance to its nearest cluster
- Recalculate the centre of each cluster based on the colours in the cluster
- If the centre of any of the clusters changed, clear the clusters and go back to 2.
0. Collect your data
This is pretty straightforward. You want to load all of the pixels colours of your image into memory. If you look at Program.cs I'm doing this very naively through a call to Image::GetPixel(). It's not terribly performant but you'll find that the calculation of the k means will likely take much longer than your repeated calls to Image::GetPixel(). One thing that is worth optimising however is the amount of data you load; if you've taken a quick snapshot with your phone's 8 MegaPixel camera you're not going to need all 8 million pixels. It's worth resizing the image down to something more mangeable. I've had good results with images with a maximum dimension of 75pixels but it will depend on the complexity of your images. Full colour photographs will work better with more pixels as compared to simple logos or drawings. A maximum image dimension of 200 pixels seems to be a good balance between results and speed.
1. Determine a set of k initial clusters
The first real part of the algorith is to determine your initial k clusters. Remember that k is how many dominant colours you want out of your image. There's two approaches to determining your initial clusters; The Forgy Method and Random Initialisation. Random Initialisation actually yields excellent results in most cases and it's really easy to implement. You just pick k random colours from your list. Their positioning in pixel space doesn't matter (infact you can discard the pixel coordinates completely it's only colour space you require). Psuedo-C# for this phase is really straight forward;
List<Color> colors = GetSourceData();
Random r = new Random();

for (int i = 0; i < k; i++) {
  int index = r.Next(0, colors.Count);
  AddInitialCluster(colors[index]);
}
The actual implementation can be found in KMeansClusteringCalculator.cs
2. Determine Euclidean Distance to nearest Cluster
Euclidean distance, sometimes known as Cartesian or Pythagorean distance, is the square root of the sum of the square differences between vector components. Obviously. To put this another way we can think of our Color as representing a point in 3-dimensional colour space (Instead of an X, Y and Z axis we have a Red, Green and Blue axis). So blue would be at position (0, 0, 255) whilst red would be at (255, 0, 0). And the Euclidiean distance between the two could be calculated with;
private double GetEuclideanDistance(Color c1, Color c2) {
    return Math.Sqrt(
        Math.Pow(c1.R - c2.R, 2) + Math.Pow(c1.G - c2.G, 2) + Math.Pow(c1.B - c2.B, 2)
    );
}
The actual implementation of this can be found in KCluster.cs.
Now that we know how to calculate the Euclidean distance between two colours it's a simple matter of comparing the distance for each colour to each of our clusters and adding it to the closest one.
var clusterList = GetClusterList();

for (Color color in colors) {
    int indexOfNearestCluster = -1;
    double distanceToNearestCluster = double.MaxValue;

    for (int i = 0; i < clusterList.Length; i++) {
        double distance = GetEuclideanDistance(clusterList[i].Centre, color);
        if (distance < nearestCluster) {
            indexOfNearestCluster = i;
            distanceToNearestCluster = distance;
        }
    }

    clusterList[indexOfNearestCluster].AddColour(color);
}
The important thing to note here is that clusterList is a list of some kind of data structure which contains the property Centre which is, for the first pass, the random colour we came up with in Step 1. Over subsequent iterations this value will be updated. So, once we find the nearest cluster we want to add the colour we're currently working on to that cluster. This is important for our next step. Again, this is only pseudo-C#, and the actual implementation can be found in KMeansClusteringCalculator.cs.
3. Recalculate the cluster centre
Like calculcating the Euclidean distance this is again something that looks a lot more intimidating than it is. If you look at Wikipedia you'll see a wonderfully confusing expression;

But this is actually rather straight forward; for each vector component (ie. red, green and blue) you take the average of that colour component in the cluster.
List<Color> colorsInCluster = GetColoursInCluster();
float r = 0;
float g = 0;
float b = 0;

foreach (Color color in coloursInCluster) {
    r += color.R;
    g += color.G;
    b += color.B;
}

Color updatedCentre = Color.FromArgb(
    (int)Math.Round(r / colorsInCluster.Count),
    (int)Math.Round(g / colorsInCluster.Count),
    (int)Math.Round(b / colorsInCluster.Count)
);
It's actually really simple. You can find the actual implementation in KCluster.cs.
4. Check for Cluster Centre Changes
This is pretty easy, actually, you take the original centre for each cluster and compute its Euclidiean distance to the new centre. If all of the distances between the old and new centres is below some threshold (or zero) you consider the algorithm complete. The new centres for each of your clusters are the dominant colours in your image. However if any of the centres have moved more than the threshold then you need to empty all of the clusters and start again from Step 2. Now however instead of computing each colour's distance to the randomly selected colour you are instead comparing it to the recalculated cluster centre. You can see this loop in KMeansClusteringCalculator.cs
Finally...
As I mentioned earlier looking at the plastic figurine image the dominant colours aren't those your eye are immediately drawn to. What you can do here is filter the data you provide for Step 0. The question is what filtering do you provide? In our figurine example the issue is that there's a lot of blacks, greys and whites all of which are rather boring. So we probably want to filter those colours out. But how? If you simply filter anything that is, for example, RGB(0, 0, 0) out it won't catch RGB(0, 0, 1) or RGB(1, 1, 1) which most people would percieve as black. What we want is some kind of way of determining the distance a colour is from black, grey and white.... like, say, our Euclidean distance from earlier. You'll want to play aroud with exact figures but I found that any colour that has a Euclidean distance of more than 200 from solid black and solid white works rather well.
List<Color> filtered = GetSourceData()
                        .Where(c => (KCluster.EuclideanDistance(c, Color.Black) >= 200) && (KCluster.EuclideanDistance(c, Color.White) >= 200))
                        .ToList();
After such a filter has been applied you'll end up with images more like...

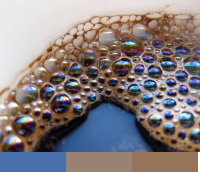


This produces excellent, eye catching, results for our plastic figurine. But notice now the most dominant colour on the coffee is the blue colour from the oil sheen? It's worthwhile playing with these threshold values to see what produces the appropriate output for your use case.
All of the source is available in my code-samples repository on GitHub. When running the code you can point it to a single file or a directory full of images. It'll produce the k means cluster for those images, output to the console, and then produce a .output.png file which contains the swatches used throughout this post.
The Curse of the Evergreen Web 12 September, 2015
With the release of Windows 10 Microsoft introduced a new browser, Edge, that promised to free us web developers from having to support IE 12 in 10 years time like we do with IE6 now. Edge is hardly the first browser to introduce constantly updated versions; Firefox and Chrome have been doing this for years. Most users of either of these browsers wouldn't have a clue what particular version of those browsers they're on. (Don't believe me? Quick, talk to a colleague, a friend, a relative and ask them if they're running Chrome 44 or Chrome 45. I'll wait...) This is something Scott Hanselman refers to as The Evergreen Web. In the article Scott talks about the importance of compatibility modes and as time progresses they're going to become more and more important. However when most developers think of browsers and compatibility modes they think rendering engines but I recently stumbled across some behaviour in Chrome 45 that was fundamentally different (and broken) as compared to the behaviour of Chrome 44. It made me realise there's a curse to the "Evergreen Web" - we developers seem to think it'll only ever mean things will get better. But humans write software and humans make mistakes. So bugs will ineveitably be introduced into the latest versions of browsers. Bugs that will break existing, well documented, standardised behaviour.
A little bit of background here; Many years ago the developers of the HTTP specification realised that connection speeds aren't infinite, that time outs happen, connections drop, and that resources can be large. So they implemented something called range requests and responses. When your browser talks to a server it tells the server "Hey! I want all of this resource!" it does this by using a request header of Range: bytes=0-. This tells the server that the web browser knows about range requests and it's currently requesting the range 0 to the end of the file. If the resource is hosted on even a remotely modern web server the server will respond with a slightly different response to normal. For one it will return a response code of 206 Partial Content instead of a standard 200 OK response. Additionally you'll see headers something like;
Accept-Ranges: bytes
Content-Length: 1234
Content-Range: bytes 0-1233/1234
This tells the web browser "FYI: I can accept byte ranges! Anyway, this file content is 1234 bytes long. And this response is the range of bytes from 0-1233 (for a length of 1234)!". The client goes about it's merry way and starts consuming the response from the server. But, alas, alark, after byte 400 your internet connection dies! A few moments later it comes back up and you try downloading that same file. Instead of requesting the entire thing your browser, knowing that the resource came from a server that supports range requests/responses, will alter the request for the resource. This time when it requests the resource it'll insert a header Range: bytes=400-1233. Now when the server receives this it'll know to skip the first 400 bytes. It'll respond with another 206 Partial Content response with headers akin to;
Accept-Ranges: bytes
Content-Length: 834
Content-Range: bytes 400-1233/1234
Then your browser knows when re-assembling the file that this response goes on the end of its prior response from the server and voila! You have the entire file without having to request the entire thing again. In our simplistic example we're talking about saving a few hundred bytes and, well, who cares? But imagine the file wasn't 1234 bytes. What if it was 100mb? 1,000mb? 4,000mb? And what if you were on a slow connection? Or a connection where you pay for data? It starts to become a pretty useful feature.
But, that's not all, this can be combined with other great "modern" features. Let's say I have an audio file on my webpage. I hear there's sites out there that do this kind of craziness. Now I click play on an MP3 but I've already heard the first half of it so I skip halfway through the file. A smart browser can look at the response from the server and make an educated guess that if the user has clicked halfway through the MP3 then it can terminate the current request and just request from the halfway point of the file. In fact, I have such an example of this happening...
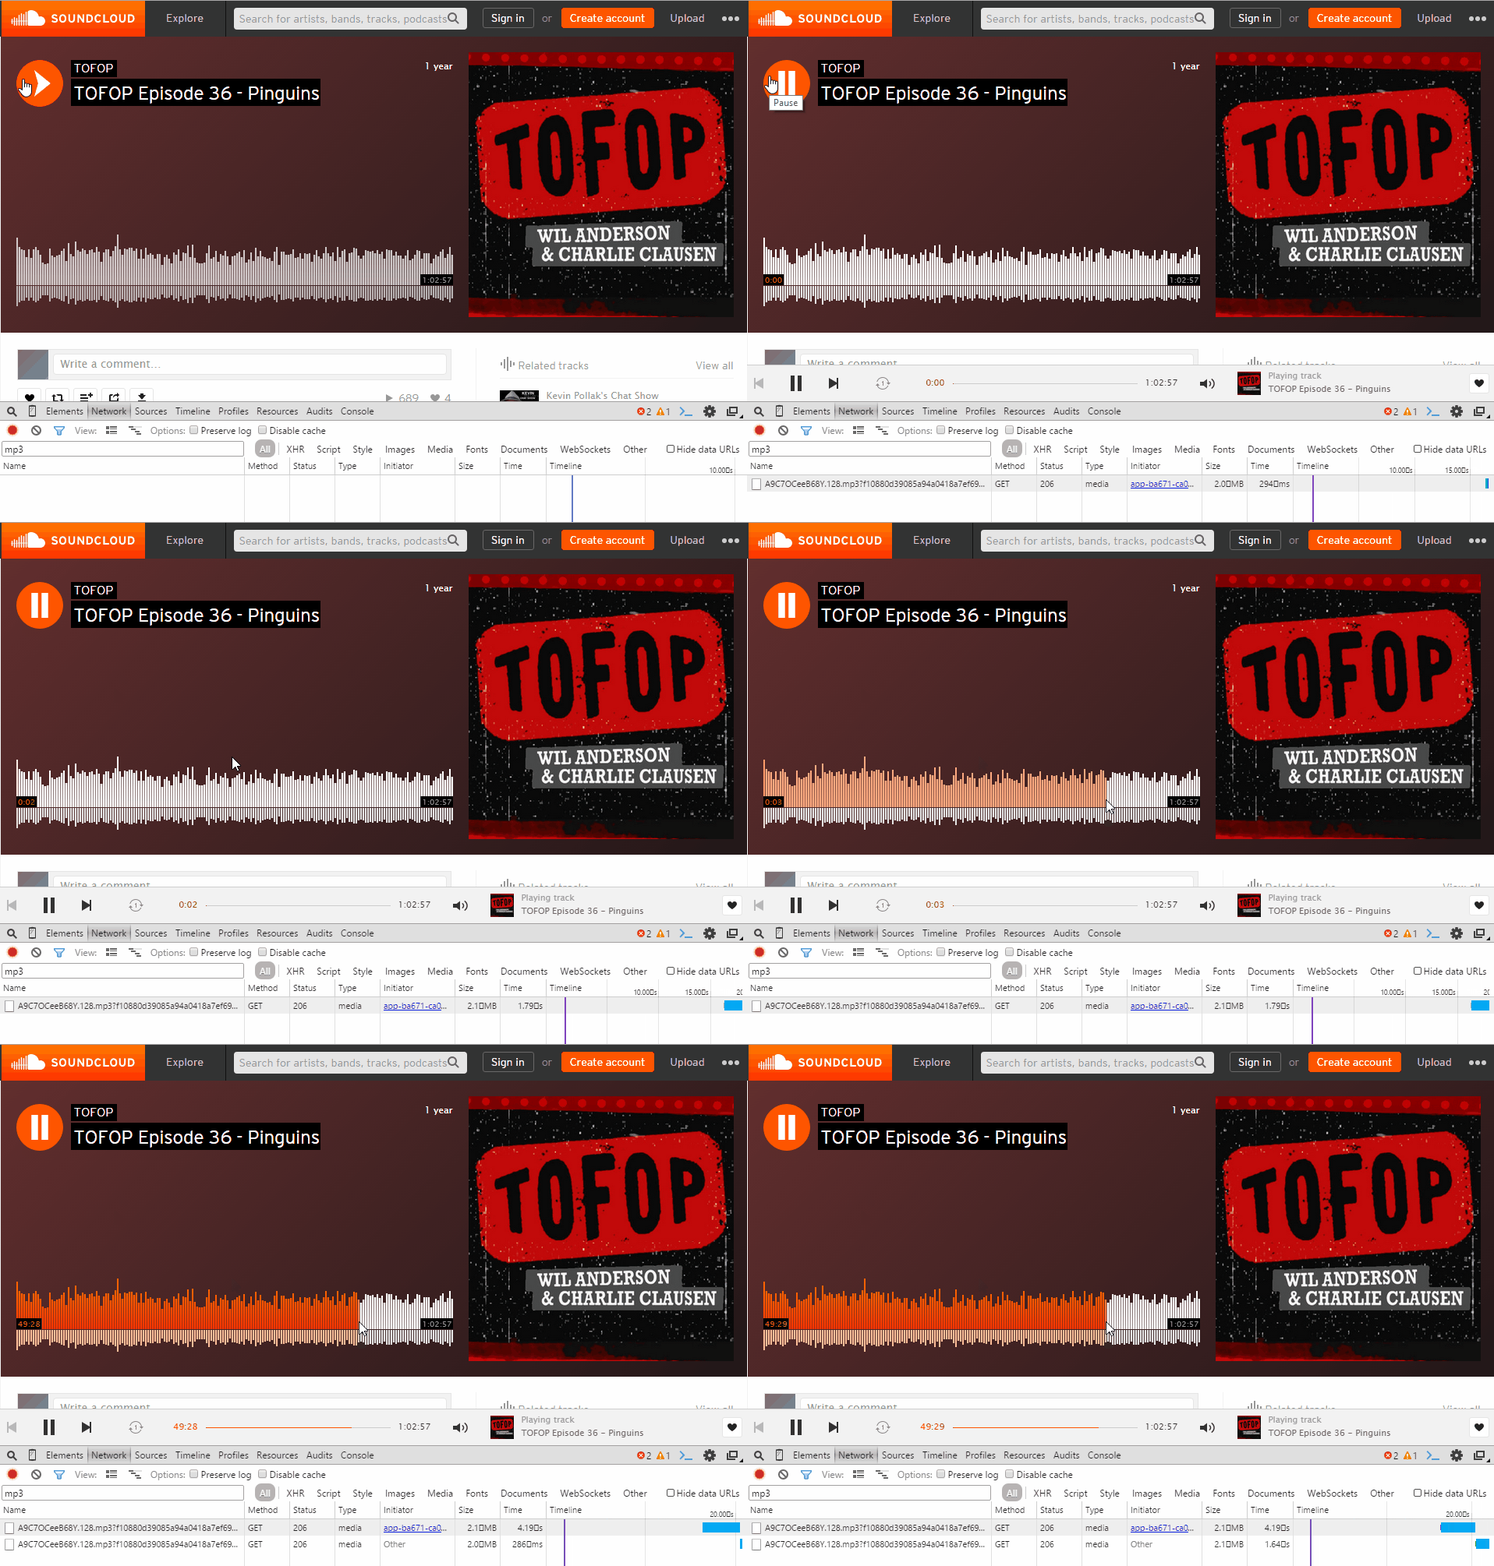
Here I am listening to Australian comedian Wil Anderson's podcast TOFOP on Soundcloud. When I hit play my browser (Chrome 44, here) starts downloading and playing the MP3. When I skip to the end of the MP3 it terminates the existing download and starts a new download at my requested position. This is great - I'm not downloading the ~40mb of data inbetween those points that I don't care about and I hear audio at the new point almost instantly.
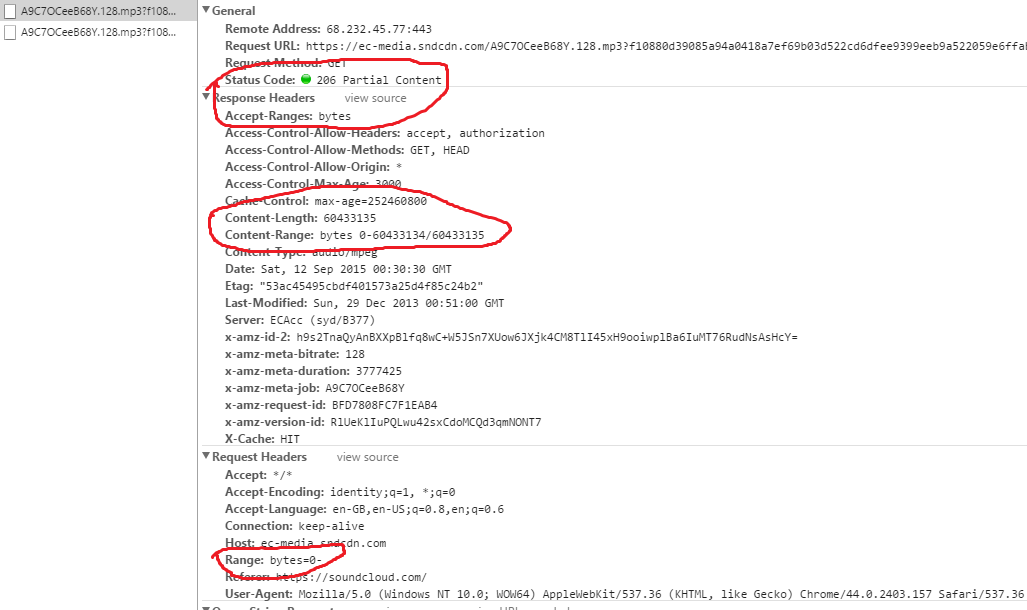
Looking through the response details you can see that my browser has indicated that it handles ranges and that the server has responded with a 206 Partial Content and indicated the range that it has served.
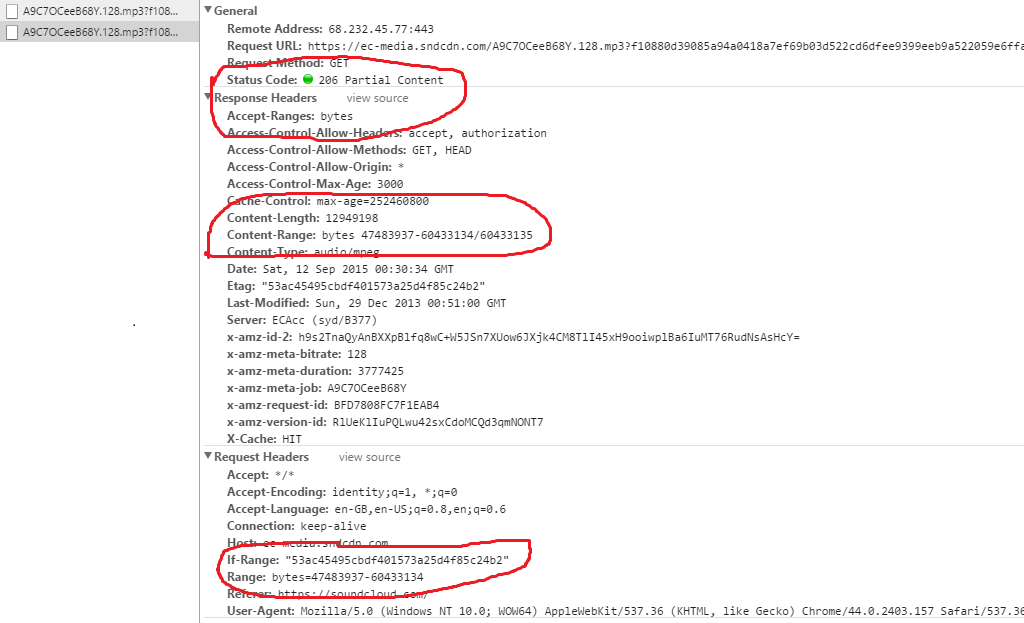
Once I click later in the file we can see that my browser has made the second request with a specific Range: bytes=... request header. The server has responded with the appropriate range.
Now, what does any of this have to do with the "Evergreen Web" ? Well all of those requests were made whilst I was on Chrome 44. Now let's try the same thing on Chrome 45.

Notice now when I through the file that the pause/play button has turned into a spinner? And that there is no termination of the connection and creation of a new request? I'm on a pretty quick connection where I am so it's not too bad too download the interim ~45mb of data. But it does interupt my listening experience. Let's just say that instead of being on a Fibre to the Premises connection I was on WiFi...
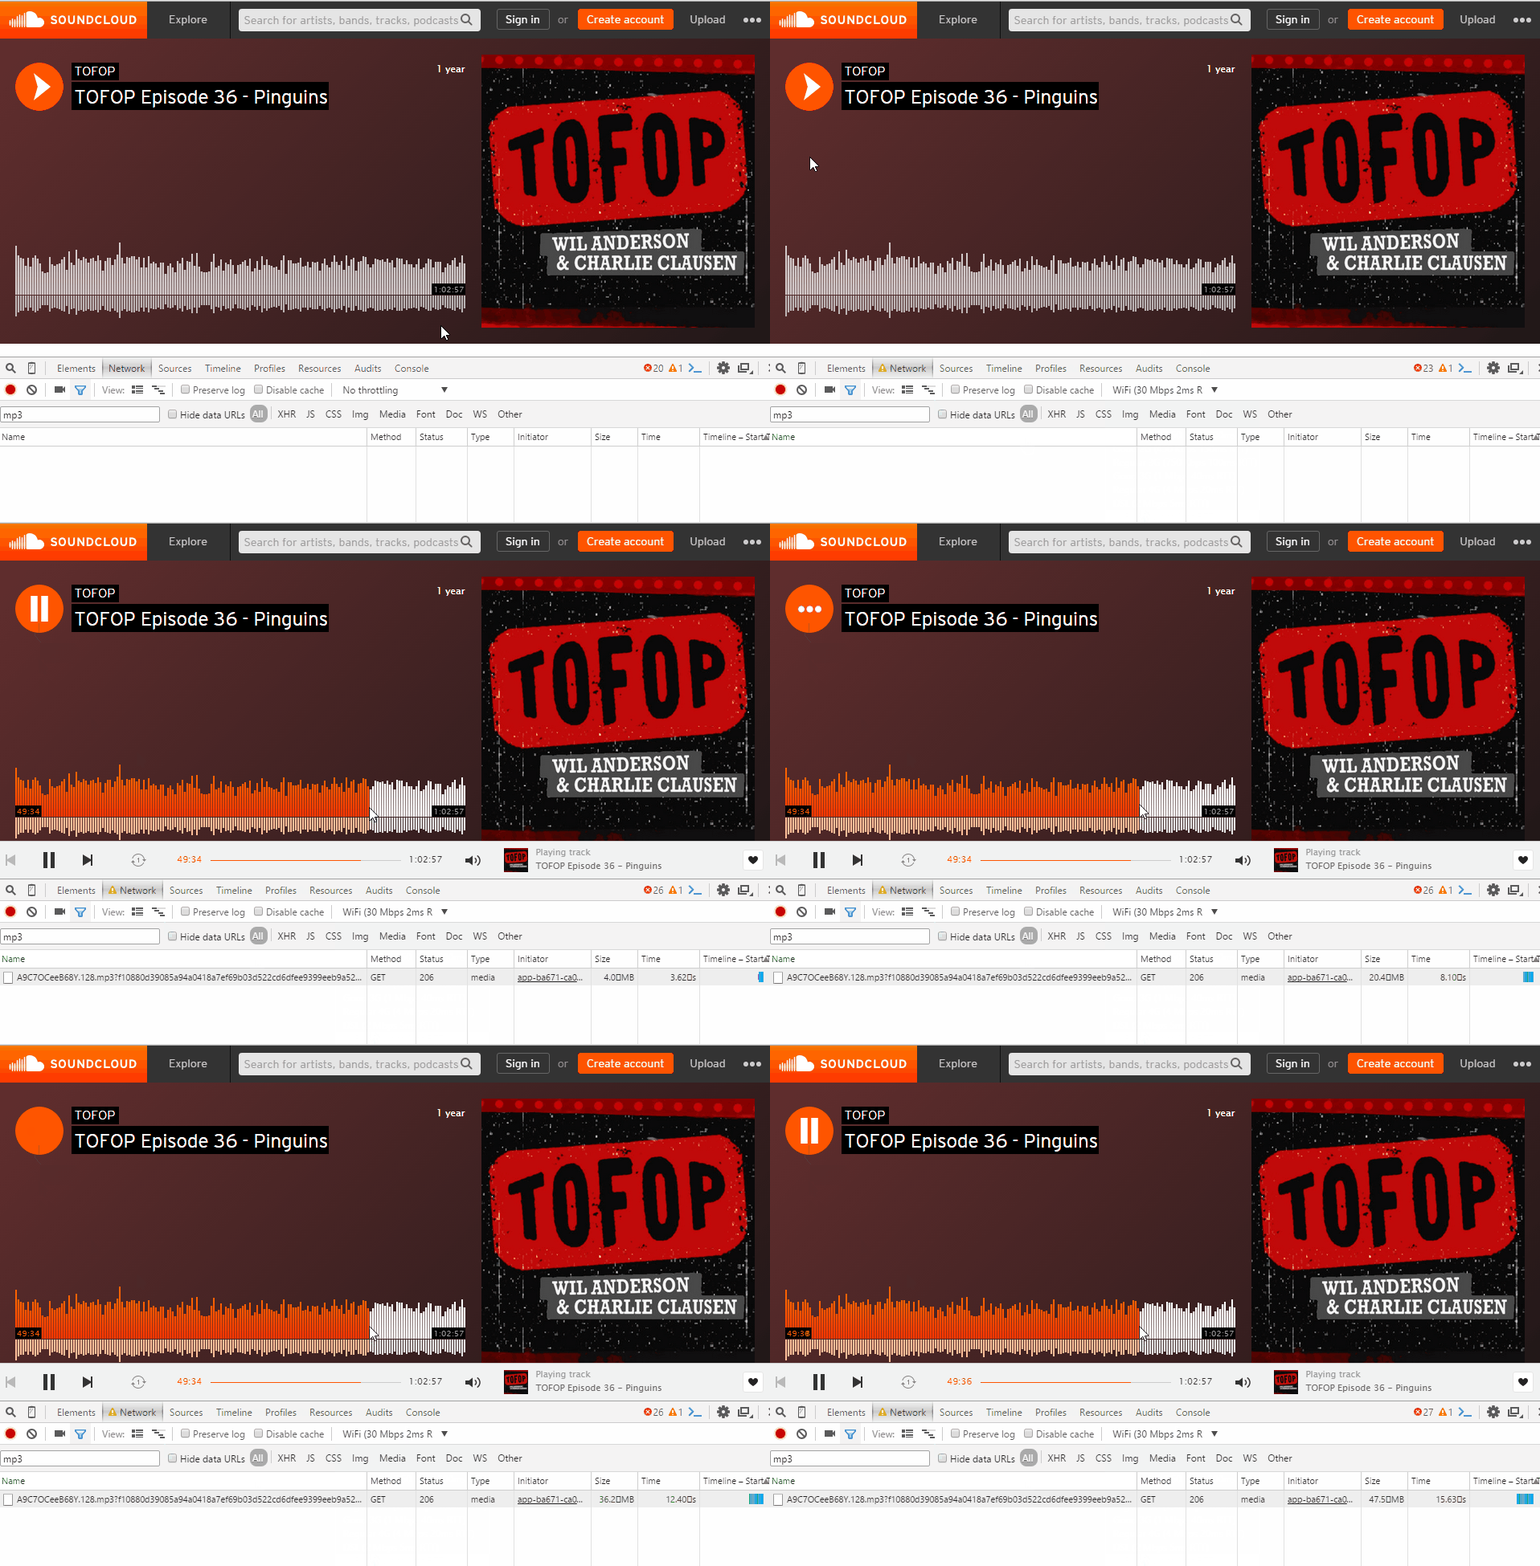
Here I've used Chrome's bandwidth throttling to simulate a WiFi connection (Still a rather good connection, mind!) and notice how much longer I have to wait before the pause/play button stops spinning? Now imagine I'm on a 3G connection. Or a DSL2 connection (which I tried to show you but my screen recording software actually crashed because it took too long).
Ignoring the horrible user experience here there's also a, potential, monetary cost. As a consumer you might be spending additional money (or time) to download that unwanted data. And if you're hosting resources? Well you just threw those 45mb of data to a client that didn't even want them. Chrome 45 was only released on the 1st of September but in those two weeks it already has ~23.93% of the browser market share. That's a lot of users potentially wasting a lot of data.
I should point out that this problem is, currently, only present in Chrome 45 when dealing with MP3s. It seems to have been done as part of a bug fix that meant that Chrome < 45 required XING/INFO headers even on CBR MP3s to seek. For most people this probably isn't a huge problem but I just spent two days playing around with potential work arounds. The Chrome team's response to this is that they'll have it fixed for Chromium 47. I'm not 100% sure on the cycle between Chrome and Chromium but Chromium 45 was branched on July 10th and Chrome 45 got released on the 1st of September. Chromium 47 is scheduled to be branched on October 2nd - if there's a similar branch to release gap we'll be living with this bug until December. In the mean time I guess a lot of MP3 bits will be getting streamed to /dev/null.
It does make me wonder though; if an issue like this is going to take the Chrome team weeks, or months, to fix are we running the risk that people will start to build to these behaviours? Maybe someone, somewhere, uses this feature to force a user to have a degraded experience if they try to skip through an ad. Not the best example but I can definitely envision a point where people build web features utilising the exact behaviour of a browser version. And if web developers start to rely on features specific to a range of browser versions is it going to become a Quirks Mode that the browser maintainers have to implement? Is someone one day going to include a <meta> tag in the <head> of their document to get newer versions of Chrome to break range requests for MP3 files?
Until Chrome 47 lands, then, if you want to skip through audio files on the web you have a few options; you can try using AAC files instead, you can use Chrome 44, or you can use another browser.
Note: If you a developer affected by this and you manage to find a work around please let me know!
UPDATE 2015-09-16: The Chrome team is now aiming to get this out in time for Chrome 46. I still have no exact idea of the timeline of when that will be. But it's better news than having to wait for 47.
SQL Server Tricks 6 September, 2015
Throughout my career I've spent more than my fair share of time in the database layer. There's a current trent in the .Net world of just letting your ORM take care of everything in the data layer for you. I'm a huge proponent of using an ORM for mapping (at work we're currently using StackExchange's Dapper.net). However I've always been a little wary of letting the ORM do everything for you. As such I thought I'd jot down a few handy SQL Server tricks I've picked up over the years.
1. The Output Clause
The OUTPUT clause let's you execute a data modification statement and have it project a result set. In plain English that means that you can perform a DELETE, INSERT or UPDATE and have it return a resultset. This has been around since SQL Server 2008 but doesn't seem to get much attention. An example might be;
UPDATE  Customers
SET     Archived = 1
OUTPUT  DELETED.Id,
        DELETED.EmailAddress
WHERE   RecentlyLoggedIn = 0
In one, atomic, operation this would mark all customer who have not recently logged in as archived as well as returning the customer id and email address for all those customers. I've seen this often implemented as something along the lines of
SELECT  C.Id,
        C.EmailAddress
FROM    Customers C
WHERE   C.RecentlyLoggedIn = 0

UPDATE  Customers
SET     Archived = 1
WHERE   RecentlyLoggedIn = 0
However, depending on your locking model applied, another process could come along and change the status of RecentlyLoggedIn between the two statements. This won't happen with the original statement I provided. It also means that the entire operation can be rolled back as a transactional unit of work.
It's worth noting that with the OUTPUT clause you get access to both an INSERTED and a DELETED psuedo-table to operate on. You can think of the INSERTED table as the "new" view of the data after the operation has finished (Only applicable with UPDATE, INSERT and MERGE) statements and the DELETED table as the view before the operation was executed (Only applicable with the UPDATE, DELETE and MERGE operation).
2. READPAST and ROWLOCK locking hints
Both of these locking hints have been available since SQL Server 2008 and work very well together.
First the ROWLOCK hint tells SQL Server to, where possible, use a row level lock instead of a page or table lock. This means that instead of locking an entire table, or index page, SQL Server will minimise the locking to only the affected row(s).
UPDATE  Customers WITH (ROWLOCK)
SET     CustomerEmailed = 1
WHERE   Archived = 1
AND     CustomerEmailed = 0
READPAST, available since SQL Server 2008, instructs SQL Server that if a row in the dataset has a row level lock applied to skip past it. This can be very handy when performing any kind of queue based work. Suppose we have
SELECT  C.Id,
        C.Email
FROM    Customers C WITH (READPAST)
WHERE   Archived = 1
AND     CustomerEmailed = 1
If this was executed whilst the ROWLOCK example was executing it would only return those rows where Archived = 1 and CustomerEmailed = 1 was true before the first transaction started executing. It's important to note that this means that any locked row is completely ignored from the resultset! Let me reiterate that; If a row is currently locked it will not be in the produced output, even though it would (once any locks are released) appear in the resultset. Depending on what you're doing this is very powerful... but if you're not aware of it you may introduce subtle, transient, bugs. So be careful.
3. RAISERROR ... WITH NOWAIT
RAISERROR .. WITH NOWAIT let's you flush a message to SQL Server Management Studio immediately rather than waiting until the end of the batch. This is useful when you're testing locking to track which statement is causing the execution to block
RAISERROR('Hello world', 0, 1) WITH NOWAIT
4. Testing Locks
The final quick tip is how you can test locks. Getting things to run at just the right time can be very tricky and the application of appropriate locking hints is highly dependent on a number of factors (indexes involved, the query analyzer, foreign keys, the statement, etc). So when it comes to testing how locks interact with each other one of the simplest tools is the WAITFOR DELAY expression. This makes SQL Server pause execution of your query until the time elapses. Eg. WAITFOR DELAY '0:00:10' would wait for 10 seconds to elapse. Using this trick you can construct queries which emulate longer running tasks or concurrent operations.
To better illustrate all of this we'll create the simple table used throughout these examples and populate it
CREATE TABLE Customers (
    [Id] [int] IDENTITY(1,1) PRIMARY KEY NOT NULL,
    [Email] [varchar](250) NULL,
    [Archived] [bit] NULL,
    [CustomerEmailed] [bit] NULL,
)
GO

INSERT INTO Customers (Email, Archived, CustomerEmailed)
SELECT  '[email protected]', 0, 0
UNION ALL
SELECT  '[email protected]', 1, 1
UNION ALL
SELECT  '[email protected]', 1, 0
UNION ALL
SELECT  '[email protected]', 0, 1
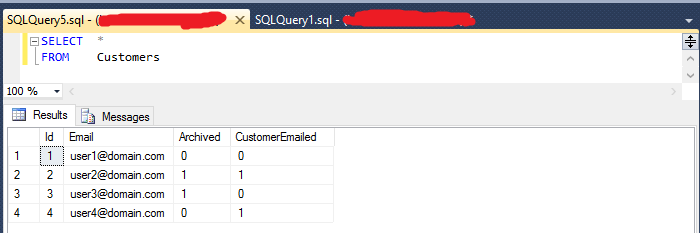
Now we'll run two different queries. The first one mark any customers as emailed that have not yet been emailed but are archived. It'll then return this recordset to the calling code. You can imagine in an actual application exeucting this statement, looping over the resultset, and emailing the associated customers. To simulate the work of emailing the customer we'll make use of the WAITFOR... DELAY statement we mentioned earlier.
BEGIN TRAN

RAISERROR('Executing update', 0, 1) WITH NOWAIT

UPDATE  Customers WITH (ROWLOCK)
SET     CustomerEmailed = 1
OUTPUT  INSERTED.Id,
        INSERTED.Email
WHERE   Archived = 1
AND     CustomerEmailed = 0

RAISERROR('Update finished', 0, 1) WITH NOWAIT

WAITFOR DELAY '00:00:10'

RAISERROR('Work finished', 0, 1) WITH NOWAIT

ROLLBACK TRAN
Go ahead and run this. After 10s you'll get the results. You may not see the actual result sets until the 10s delay has elapsed but if you switch to the Messages tab instead of the Results tab you'll see it straight away printint out the "Executing update" and "Update finished" messages. The second query we'll execute will select those customers who have been emailed.
BEGIN TRAN

RAISERROR('Selecting with READPAST', 0, 1) WITH NOWAIT

SELECT  *
FROM    Customers WITH (READPAST)
WHERE   CustomerEmailed = 1

RAISERROR('Selecting without READPAST', 0, 1) WITH NOWAIT

SELECT  *
FROM    Customers
WHERE   CustomerEmailed = 1

RAISERROR('Executing update', 0, 1) WITH NOWAIT

ROLLBACK TRAN
If we execute this at the same time as the first query you will immediately get back the list of customers. And then, once the first query has finished, you'll get the second resultset. One thing to note is that if the first transaction committed you would get back 3 customers in the second resultset but still only 2 customer in the first resultset.
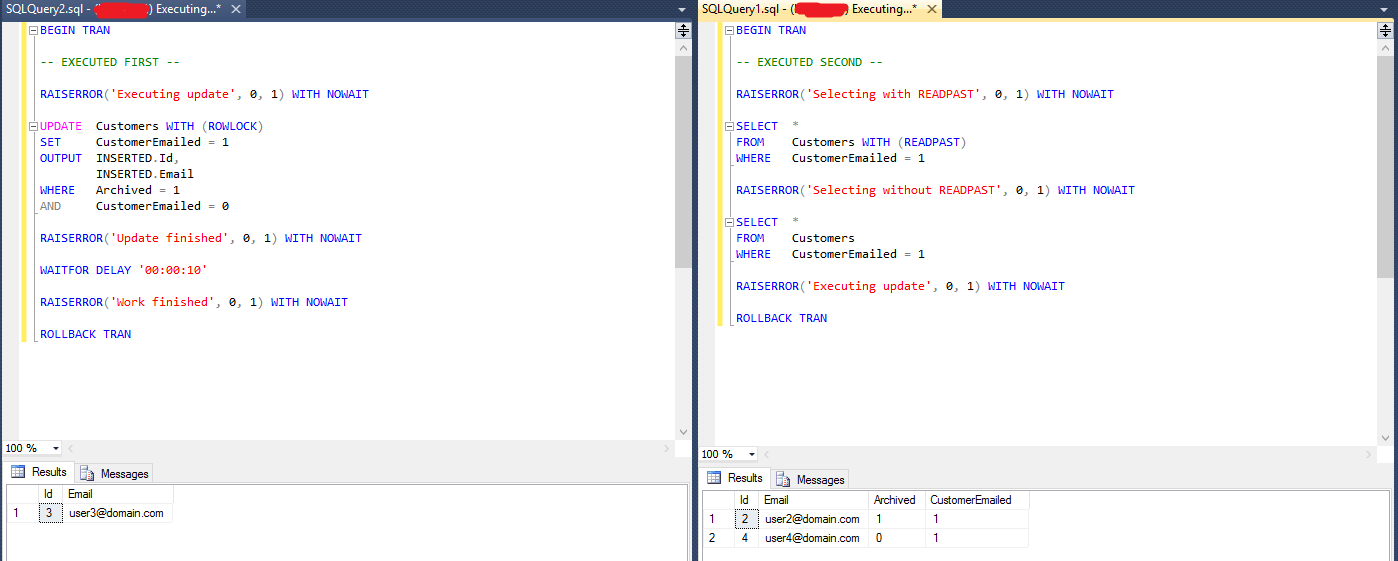 Whilst both queries are executing you'll see something output something like this. Note that the lefthand side has generated its resultset as has the
 READPAST query on the right hand side. But the second resultset on the right hasn't generated yet.
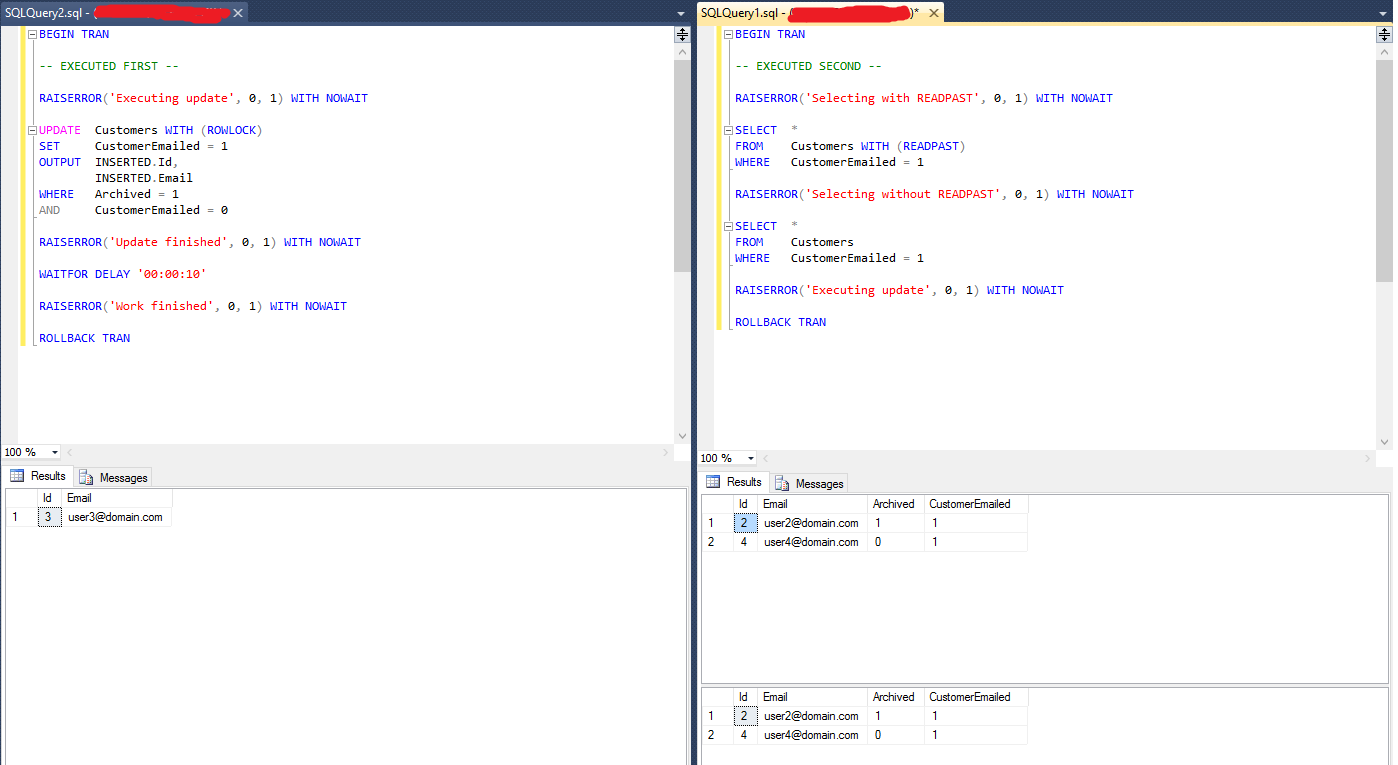
Once the WAITFOR DELAY has finished (and any work is committed or rolled back) the second resultset on the right will generate. You can verify that by running sp_who2 'active' while both are running.
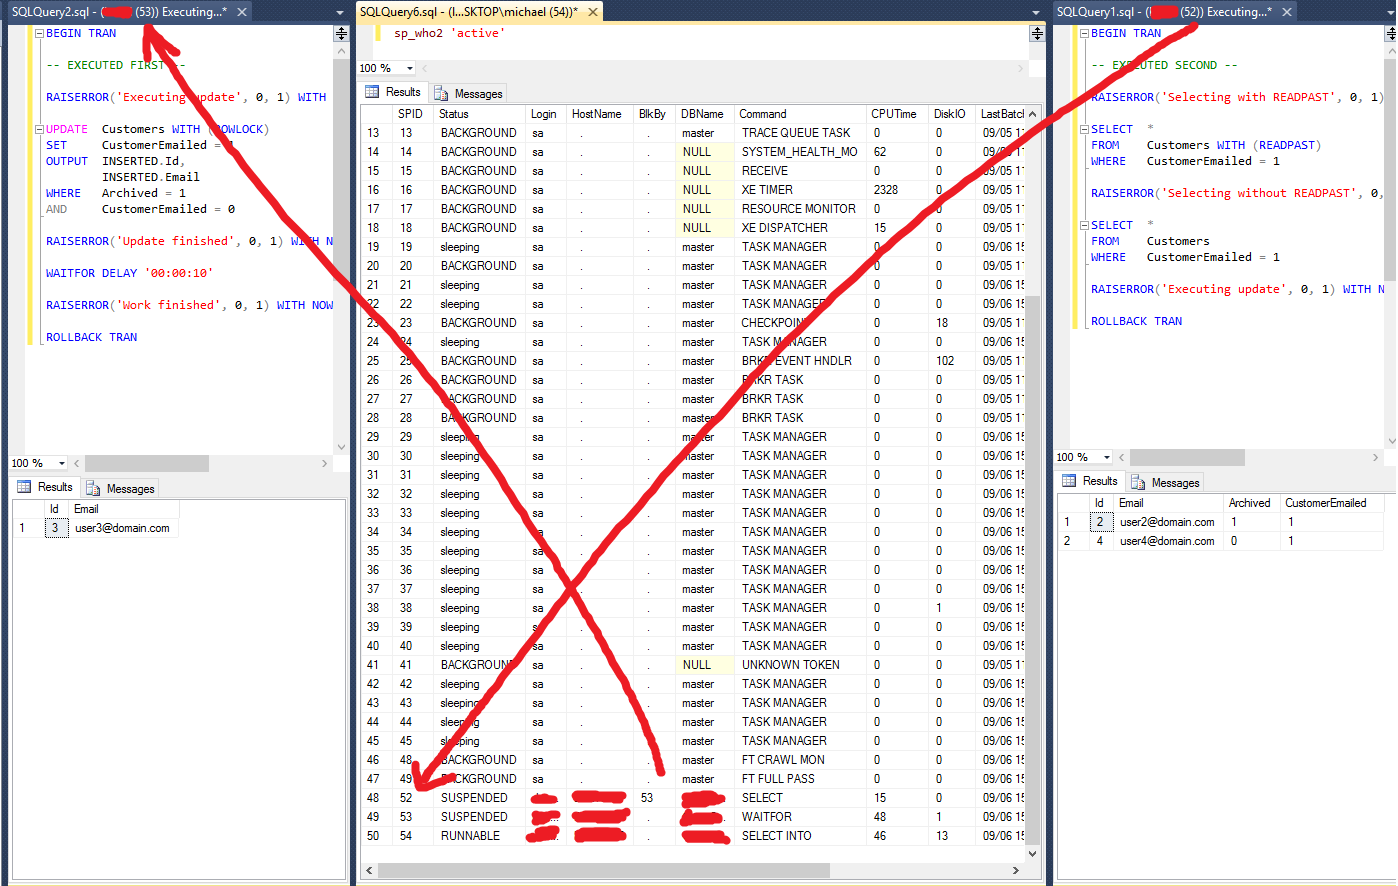 Here we can see that the right hand query, SPID 52, is currently blocked by SPID 53, which is the left hand side.
Hope you find these little tips helpful!
Tags? 31 August, 2015
After doing my initial post yesterday I realised it'd be useful to have tags (or categories, whatever your preferred nomenclature) support. It's an easy way for a user to quickly find everything relating to, say, Pretzel without having to read about cats. How do we go about getting such a feature? Remeember that Pretzel is a static blog engine. Everything is generated offline on your computer and then uploaded to your host (in my case, Github Pages) so there's no hitting a database to pull back the relevant files.
If you investigate a little bit you'll find that when you're viewing an individual post the template used to generate the static HTML is _layouts/post.html which seems to have some code relating to tags;
The default set up has some support for it! Excellent! If you look at the mark down source files for your post you'll see there's a block of YAML at the top (actually this is something Jekyll refers to as Front Matter and is how it determines the file is special and needs processing. Pretzel follows this same convention). We need to add some tags to this block. The Front Matter for this post might be;
---
layout: post
title: "Tags?"
tags: [ pretzel, blog ]
---
This tells Pretzel that this post has two tags associated with it; Pretzel and blog. Let's fire up Pretzel and "taste" things...

Success! I'll just go click on those tag links and...
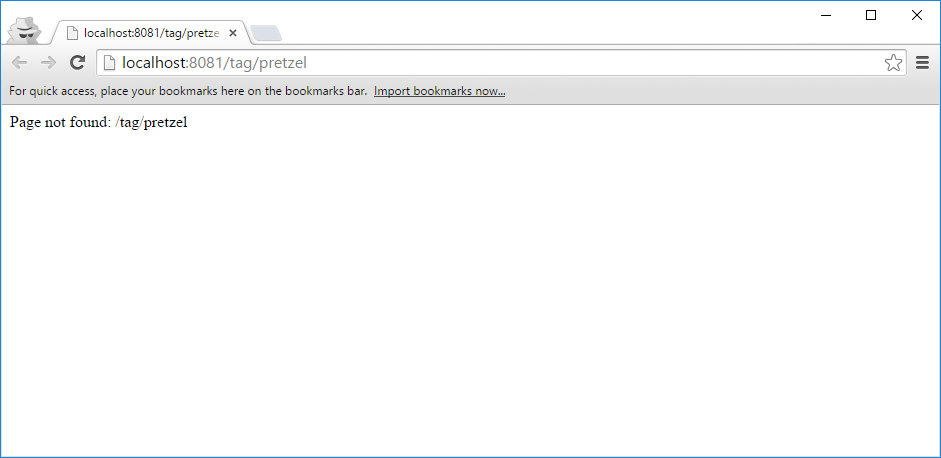
I should have known that'd be too easy. If you have a look about the place you'll find that there's a plugin for Jekyll to support tags. But that's not that helpful to us. So back to the drawing board. I came across a post on using tags on Github Pages - it seems that Github Pages don't support the tags plugin so Jekyll users are in a similar boat to us. Interesting!
Going through the steps in the Minddust post we can straight away skip the first two - the default Pretzel templates already contain markup for tags. Let's start with creating a new layout. Create a new file _layouts/posts_by_tag.html and we'll copy the content from Minddust;
<h1>Articles by tag :</h1>
<div>

        <p>There are no posts for this tag.</p>

</div>
After a bit of trial and error I found you don't actually need _data/tags.yml either so ignore that. We do, however, have to create a template-per-tag. This is where such a method will kind of fall down. If you use lots and lots of tags this is the sort of thing that you are (well, I am, anyhow) likely to forget. If you do then your readers will get a 404 when they click on a tag that you haven't "populated" yet. In lieu of a better solution we'll live with this. Now we'll create our first tag layout file - for me that's tag/blog.md. (Note: The tag portion is because our URLs will be of the form tag/blog - if you wanted these to be of the form my-awesome-tags/blog your blog.md would instead live in the my-awesome-tags directory. Jekyll / Pretzel will copy directories from the input to the output unless they start with an underscore).
---
layout: posts_by_tag
tag: blog
permalink: /tag/blog
---
Nothing else is needed in our layout file. A couple of notes; the layout value should be the filename of your layout file, without the path or extension, that you created earlier (eg. I have _layouts/posts_by_tag.html so this value is posts_by_tag). The permalink tag here just sets the output URL to be used. I want to serve my tag page as /tag/blog instead of the default /tag/blog.html.) Now that that's done let's test it out!
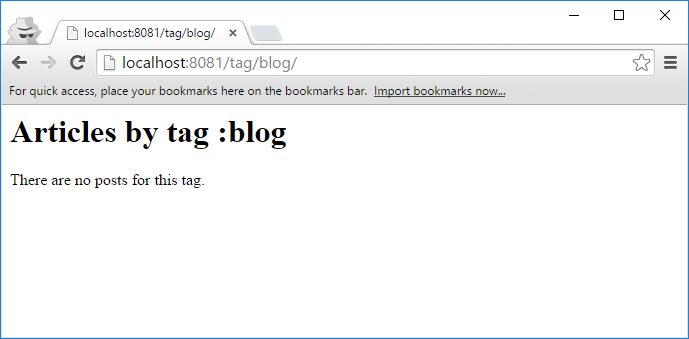
... And apparently I have even fewer blog posts than I thought! The good news is we aren't getting a 404 anymore. The bad news is... we're not getting our nice list of posts for the tag. What gives? I did a little digging and it turns out it's the syntax of the layout file. Whilst Pretzel is largely compatible with Jekyll it isn't 100% so. The way it does tags is one of those differences. In Jekyll it seems like it's a dictionary of tag names to posts. However in Pretzel tags are a list of tag items each of which has the name of the tag and all of the posts for that tag. (Side note: I believe Categories work the same way). So our copy-pasta'd layout file just isn't going to cut it.
<h1>Posts by tag </h1>
<div>


        <p>There's no posts for ""!</p>

</div>
First off we're going to set a variable HasTag to false. We'll then loop through all of the tags that have been used on our site and compare the Name to the tag the user is currently looking at. If they match we set HasTag to true and loop through all of the Posts on the tag and output a link to the post using it's title. Finally if HasTag is still false we can print out "No tags found" style message. Now let's try again...
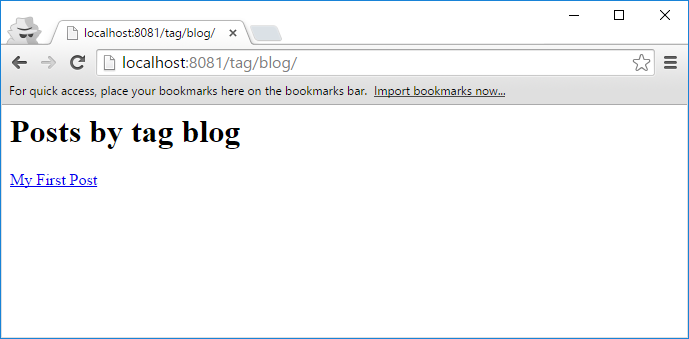
... And it works! It's not pretty but it's a list of all my posts. Now why does this look so bland compared to the rest of the posts (not that they're terribly pretty, but still!). If you snoop about your setup you'll see there's _layouts/layout.html which has all the base styling for your site. When you look at the default _layouts/post.html you'll see at the top it has
---
layout: layout
---
It might look a little redundant but it's actually saying "Inherit the layout for this file from the file stored at _layouts/layout.html". So, we just need to add a similar tag to our posts_by_tag.html;
---
layout: layout
---
<h1>Posts by tag </h1>
<div>


        <p>There's no posts for ""!</p>

</div>
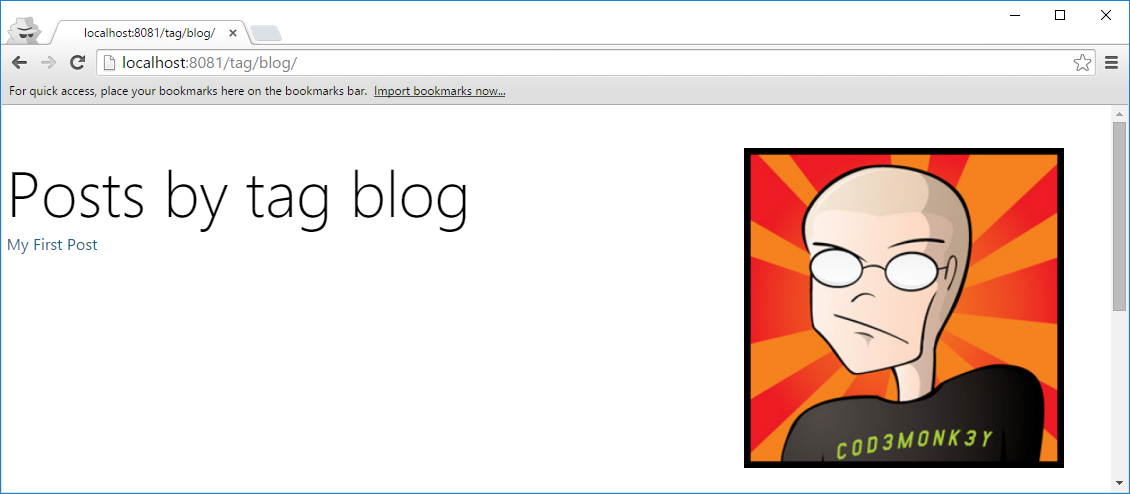
And that's about it! Have a look through the list of Liquid Variables for other details you may wish to include on your listing page (such as the post.date). And finally don't forget you'll need to go through and create a corresponding .md file in tag for each tag you use on your site. In the future I'll look at seeing if this is something I can automate as I'm not one for doing something a computer will do much more reliably.
My First Post 30 August, 2015
Several years ago now Scott Hanselman wrote a blog post titled Your Blog is the Engine of Community. The basic premise of it, for those too lazy to read it, was that you should own your own content. Sites like Twitter and Facebook are intrinsically transient and, perhaps more importantly, owned by someone else. "That makes sense!" I thought. And so I had a look about on the internet came across Github Pages had a quick play and... forgot about it. And then today a friend of mine was looking at ditching Wordpress for their own blog and asked if I had any suggestions. I gave a half hearted reply about something like Github Pages and then... thought about it... and thought I should finally get my act together and finish playing with them myself.
My initial issue last time I looked into Github Pages was that they run Jekyll. Which isn't a bad thing, it's a nice bit of software, but as a Windows developer it seemed like a bunch of things I've only had passing exposure to. I had a look for other static blog engines and came across Pretzel. Like Jekyll Pretzel generates a static blog for you from Markdown however unlike Jekyll it's written in .Net and feels more "natural" to a C# developer like myself. I did, however, have a few minor issues along the way, so I figured I'd kill two birds with one stone and write about them.
1. Getting Pretzel
Probably the easiest way to grab Pretzel is actually from Chocolatey. It's listed as Pretzel
This'd be as simple as;
choco install pretzel
Personally I grabbed the source code from their Github Page and built it myself
git clone https://github.com/Code52/pretzel
cd pretzel
build.cmd
After a while you'll end up with artifacts\Pretzel.exe which you'll want to add to your path
2. Setting up your Github Page
Github actually has really good documentation on this. The basic premise is you set up a new repository wih the name $YourUsername$.github.io. Mine, for instance, is mrmdavidson.github.io
You'll want to clone this locally, add some content, and push it...
git clone https://github.com/MrMDavidson/mrmdavidson.github.io
cd mrmdavidson.github.io
echo "Hello World!" >> index.md
git add index.md
git commit -am "My first page!"
git push
If you then visit your own $YourUsername$.github.io you'll see your "Hello World" page. Hooray!
3. Now let's make use of Pretzel
To get started with Pretzel is actually pretty straight forward. We're going to jump into the directory we created early and, with Pretzel in our path, tell it to do some things
cd mrmdavidson.github.io
pretzel.exe create
This will create all the infrastructure required for your blog and create a sample post and an about page. But it's all in MarkDown. How do we use it?
Pretzel has two main modes "Taste" and "Bake" (Because Pretzels, get it?). Taste allows you to fire everything up locally and test it. Pretzel includes everything needed for this (including an Owin based webserver).
pretzel.exe taste -p 8081
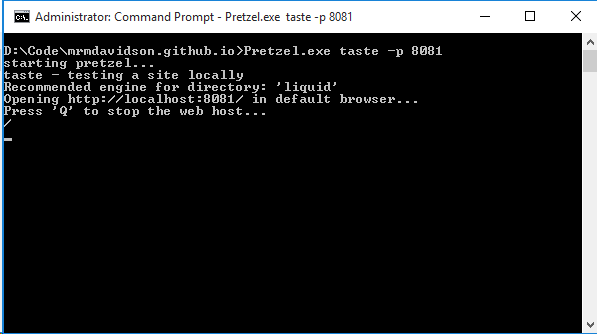
(You may need to play around with the -p 8081 argument to specify a port that's currently not in use on your machine)
This will also fire up your default browser and show you your newly created blog post. You can play around with the content by editing the file it created in the _posts/ directory.
Once you get bored of poking at it we'll commit it and push it to your repository so it can be seen by the world!
git add *
git commit -am "My new blog!"
git push
Now visit your own Github Page. Eg. mrmdavidson.github.io
4. ... But something isn't right!
For me, at least, I noticed some inconsistencies between what Jekyll generated and what Pretzel generated. This seems like something that'd be horrible to debug. So I poked around a little and found that you can use Github Pages as a completely static host. You don't have to have it generate anything with Jekyll. "Interesting", I thought. How does this work?
Well, remember earlier how I said Pretzel has two modes? Tasting and Baking? We want the baking mode;
cd mrmdavidson.github.io
pretzel.exe bake
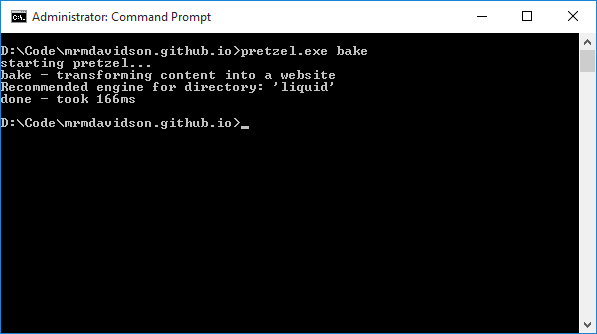
Milliseconds later it'll have finished its work.
Now inside your repository you'll have an _site directory. This is a static build of your site (Note: Anything starting with _ is ignored by Jekyll and Pretzel by convention). You can point your browser here and everything should work. But if you push this to your repository it won't have the desired results. What we're going to do is place a ".nojekyll" file in our directory - this is an instruction to Github to not run Jekyll on this repository. I know this seems counter intuitive, but trust me.
echo "" > .nojekyll
git add .nojekyll
git commit -am "Opt out of Jekyll generation"
git push
Now if you visit your lovely blog... it'll be completely broken. How is this helpful? Stay with me here!
What we're going to do is create a new branch. Master will be used for the generated content of the site. And our new branch, say, Pretzel will be used to store our working blog. This way both our blog "data" and our generated site is under source control.
To avoid confusion we'll create two new copies of the repository...
git clone https://github.com/MrMDavidson/mrmdavidson.github.io mrmdavidson.github.io-blog
git clone https://github.com/MrMDavidson/mrmdavidson.github.io mrmdavidson.github.io-generated
cd mrmdavidson.github.io-blog
git checkout -B pretzel
git push origin
Now what we'll do is create blog posts in the mrmdavidson.github.io-blog directory which pushes to a "Pretzel" branch. Once we've finished tasting these we can generate the static content into master. Let's start by cleaning master. You'll want to delete from git everything in here but your .nojekyll file. Once you've done that...
cd mrmdavidson.github.io-blog
pretzel.exe bake --destination ..\mrmdavidson.github.io-generated\
The --destination switch tells Pretzel to generate to a specific, relative-to-current, directory. In this example we're going to generate to our working copy of the Master branch.
We can now add everything in here and push to master...
cd mrmdavidson.github.io-generated
git add *
git commit -am "Initial generated version of the blog!"
git push origin
5. Automating it...
That all seems a bit tedious, but repeatable, so what I did was create a generate.bat in my Pretzel branch that bakes the blog, adds everything to git, and pushes it to master...
pretzel bake --destination ..\mrmdavidson.github.io-generated\
pushd ..\mrmdavidson.github.io-generated
git add *
git commit -am "Generated site"
git push origin
popd
This way once I'm finished tasting my blog locally I can just run generate.bat and seconds later everything is available to the public!